
如何用IB_DESIGNABLE(@IBDesingable) & IBInspectable(@IBInspectable)在Xcode 6+中创建可设计的视图控件,以便和设计妹子更好的交流、以及复用。顺带复习下Quartz。
生活上琐事缠身,已经好久没写blog,一直荒着也不是个事,索兴用午休时间写个Demo。简单说一下如何用XCode 6+来创建可设计的视图控件,顺带复习下Quartz。
先说说@IBDesignable和@IBInspectable。
@IBDesignable:告诉XCode将指定的类在Interface Builder里进行实时渲染,即在一些属性发生改变,调用重绘方法。
@IBInspectable:声明在Interface Builder中可见且可修改的“动态属性”。
其基本用法如下:
- Swift
import UIKit

@IBDesignable
class MyCustomView: UIView {
    @IBInspectable var customAttribute: <#Type#>!
    …
}- objective-C
#import <UIKit/UIKit.h>

IB_DESIGNABLE
@interface MyCustomView : UIView
@property(nonatomic) IBInspectable <#Type#> customAttribute;
@end
此时,如果在Interface Builder里添加一个UIView并修改其类为MyCustomView,那么在其属性栏里会添加出一个MyCustomView分组,分组中包含添加的属性Custom Attribute。如图。

简单示例
出于时间考虑,简单做个表盘,用三层圆弧外而内分别表示H,M,S(额,好像反了,呵呵……好在这不是重点),然后中间放置一个图片做logo,如图。

添加Designable支持和自定义属性
1.定义ClockView类。
添加Designable标识,以OC为例,故添加IB_DESIGNABLE
2.添加Inspectable属性。
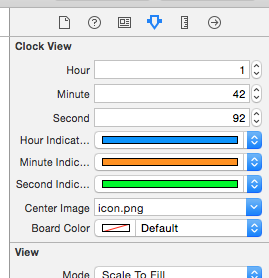
表盘颜色boardColor,三个时间指示弧颜色hourIndicatorColor、minuteIndicatorColor、secondIndicatorColor,时间的H、M、S值:hour、minute,second,以及中间logo图centerImage。代码如下。
#import <UIKit/UIKit.h>

IB_DESIGNABLE
@interface ClockView : UIView

@property(nonatomic) IBInspectable NSInteger hour;
@property(nonatomic) IBInspectable NSInteger minute;
@property(nonatomic) IBInspectable NSInteger second;

@property(nonatomic, strong) IBInspectable UIColor *hourIndicatorColor;
@property(nonatomic, strong) IBInspectable UIColor *minuteIndicatorColor;
@property(nonatomic, strong) IBInspectable UIColor *secondIndicatorColor;

@property (nonatomic, strong) IBInspectable UIImage *centerImage;
@property (nonatomic, strong) IBInspectable UIColor *boardColor;

@end
3.此时,打开storyboard文件,拖一个UIView到ViewController里,修改其Class为ClockView。然后切换到属性列表下,会看到刚刚添加的属性,随便填写以下以备后用(时间就好好填写吧,时间关系没空去容错)。如图。
利用这些属性来布局、重绘
好了,剩下的就是利用这些属性来布局了,复习下Quartz吧。
1.表盘board,直接贝塞尔曲线。
UIBezierPath* boardPath = [UIBezierPath bezierPathWithOvalInRect: CGRectMake(_center.x - _minB / 2.0, _center.y - _minB / 2.0, _minB, _minB)];
[_boardColor setFill];
[boardPath fill];2.然后是H,M,S的曲线,定义画弧方法- (void)drawArcWithRadius:(CGFloat)radius degree:(CGFloat)degree color:(UIColor*)color context:(CGContextRef)context;
radius:半径
degree:画弧弧度
color:画弧颜色
实现如下:
- (void)drawArcWithRadius:(CGFloat)radius degree:(CGFloat)degree color:(UIColor*)color context:(CGContextRef)context {
        // 获取rgba
    CGFloat r,g,b,a;
    [color getRed:&r green:&g blue:&b alpha:&a];
    CGContextSetRGBStrokeColor(context, r, g, b, a);    // 设置当前笔头颜色
    CGContextSetLineWidth(context, _borderWidth);       // 设置当前画笔粗细
    CGContextSetLineCap(context, kCGLineCapRound);      // 设置圆角
        // 画弧
    CGContextAddArc(context, _center.x, _center.y, radius, - M_PI / 2.0, degree - M_PI / 2.0, false);
    CGContextStrokePath(context);
}
然后依次画出H,M,S的指示弧:
// 时针指示弧
- (void)drawHourIndicatorInRect:(CGRect)rect context:(CGContextRef)context {
    CGFloat r = _minB / 2.0 - 1.0 - _borderWidth / 2.0;
    CGFloat degree = (_hour % 12) / 12.0 * 2 * M_PI;
    [self drawArcWithRadius:r degree:degree color:_hourIndicatorColor context:context];

}
// 分针指示弧
- (void)drawMinuteIndicatorInRect:(CGRect)rect context:(CGContextRef)context {
    CGFloat r = _minB / 2.0 - 10.0 - _borderWidth * 3.0 / 2.0;
    CGFloat degree = (_minute % 60) / 60.0 * 2 * M_PI;
    [self drawArcWithRadius:r degree:degree color:_minuteIndicatorColor context:context];
}
// 秒针指示弧
- (void)drawSecondIndicatorInRect:(CGRect)rect context:(CGContextRef)context {
    CGFloat r = _minB / 2.0 - 20.0 - _borderWidth * 5.0 / 2.0;
    CGFloat degree = (_second % 60) / 60.0 * 2 * M_PI;
    [self drawArcWithRadius:r degree:degree color:_secondIndicatorColor context:context];

}
3.绘制中心的图片logo。
- (void)drawCenterImageInRect:(CGRect)rect context:(CGContextRef)context {
    CGFloat r = _minB / 2.0 - 25.0 - _borderWidth * 3;
    CGSize imageSize = CGSizeMake(r * 2.0, r * 2.0);
    //// Oval Drawing
    UIBezierPath* imgPath = [UIBezierPath bezierPathWithOvalInRect: CGRectMake(_center.x - imageSize.width / 2.0, _center.y - imageSize.height / 2.0, imageSize.width, imageSize.height)];
    CGContextSaveGState(context);
    [imgPath addClip];
    [_centerImage drawInRect: CGRectMake(_center.x - imageSize.width / 2.0, _center.y - imageSize.height / 2.0, imageSize.width, imageSize.height)];
    CGContextRestoreGState(context);
}
在ClockView的-drawRect:方法中依次调用上面的绘图代码,绘制完工。打开Storyboard瞅瞅,随便拖一张图片到工程里来,在Interface Builder里设置好centerImage属性,That’s great!
总结 & Demo下载
由于时间紧迫,没有做详细的设计、动画和容错,有时间大家可以补上。

总之,忽悠设计妹子,So Easy,以此也可以生产一批可复用的控件库,大大提高开发、迭代效率。